
Is your Ruby on Rails application running on an outdated version that you have been postponing to upgrade? What seems like routine maintenance can slowly turn into growing technical risk. Unsupported dependencies, missed security improvements, and compatibility issues can accumulate, making future upgrades more complex and disruptive.
A Rails upgrade is more than a version change. It is a strategic step that strengthens performance, security, and long term maintainability when handled correctly. With the right planning, audits, testing, and deployment safeguards, the process becomes controlled and predictable instead of stressful.
In this article, you will learn how to evaluate your current setup, choose the right upgrade strategy, and execute a Rails upgrade safely while protecting business continuity.
Why upgrading Ruby on Rails is a strategic decision
Many teams treat upgrades as routine maintenance. In reality, they are strategic inflection points that influence engineering direction and product sustainability.
Newer Rails versions often introduce:
- Performance optimizations that improve request handling and system responsiveness
- Improved memory management for better resource utilization
- Modern security defaults aligned with current standards
- Cleaner configuration standards that simplify maintenance
- Better long-term framework support and ecosystem compatibility
Beyond features, staying current keeps your application aligned with the broader ecosystem. Libraries, third-party services, and hosting platforms gradually stop supporting older versions. Waiting too long can force rushed, high-risk migrations later under business pressure.
According to the Stack Overflow Developer Survey, Ruby continues to remain relevant across production environments, reinforcing the importance of long-term maintainability and sustainable upgrade practices.
A well-timed Rails upgrade protects your product roadmap and keeps your engineering velocity sustainable over time.
What should you evaluate before upgrading a Ruby on Rails application?
Jumping into an upgrade without clarity increases risk significantly. Preparation is where most successful upgrades are won.
Start by documenting:
- Current Ruby version used in development and production
- Current Rails version running in the application
- Target version you intend to upgrade to
- Deployment environment details including servers and infrastructure
Next, assess the version gap. Moving from one minor version to another is very different from jumping across multiple major releases that introduce breaking changes.
You should also audit:
- Custom initializers and configuration overrides that may conflict with new defaults
- Background job processors and scheduling systems
- Authentication and authorization systems
- External API integrations and third-party services
- Asset compilation and frontend build setup
- Database adapters and ORM configurations
Third-party gems deserve special attention. Outdated dependencies are the most common upgrade blockers. Some may require replacements with actively maintained alternatives. Others may need temporary patches or internal forks. A few might even require architectural redesign.
Finally, define your operational safeguards:
- A complete production backup before making changes
- A tested rollback plan in case issues occur
- A staging environment that closely mirrors production
- A clear stakeholder communication plan to set expectations
Upgrades should never surprise your business team. Transparency reduces pressure and aligns expectations across departments.
Direct upgrade vs phased upgrade: choosing the safer path
Two primary upgrade strategies exist.
Direct upgrade
This approach jumps directly to the latest stable version of Rails.
It can work well when:
- The version gap is small and manageable
- The application is relatively lightweight
- Strong automated test coverage exists across core workflows
However, when multiple breaking changes stack together, debugging becomes more complex and time consuming.
Phased upgrade
A phased upgrade moves incrementally through supported intermediate versions.
This strategy allows:
- Isolated debugging of smaller changes
- Controlled refactoring at each stage
- Easier dependency adjustments
- Progressive validation after every version jump
For mature or enterprise-grade applications, phased upgrades typically reduce risk and improve predictability.
What are the core steps in a Rails upgrade?
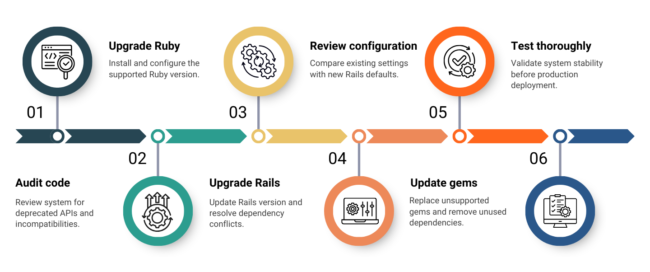
A structured execution sequence prevents chaos and confusion.
Step 1: Conduct a code and dependency audit
Begin with visibility into your existing system.
Identify:
- Deprecated Rails APIs that must be refactored
- Removed configuration options no longer supported
- Legacy coding patterns that require modernization
- Background job incompatibilities
- Asset pipeline dependencies and frontend tooling issues
This audit defines the true scope of effort required and avoids unrealistic timelines or surprises mid-upgrade.
Step 2: Upgrade the Ruby version if necessary
Install the new Ruby version using tools like RVM, rbenv, or asdf to manage versions safely.
Update:
- The .ruby-version file for consistency
- The Ruby declaration inside your Gemfile
After installation, run bundle install and verify that all gems compile successfully. Native extensions can fail during Ruby upgrades, especially in older or complex codebases.
Run smoke tests immediately after updating Ruby to confirm system stability before proceeding.
Step 3: Update the Rails version
Modify the Rails version in your Gemfile and update dependencies accordingly.
Expect:
- Deprecation warnings that require refactoring
- Configuration differences between versions
- Middleware stack changes
- Framework-level behavioral adjustments
Resolve warnings gradually and carefully. Avoid silencing them without understanding the underlying cause.
For detailed version-specific changes and migration notes, refer to the official Ruby on Rails upgrade guide. Reviewing the official documentation ensures you address breaking changes correctly and follow recommended upgrade practices.
Step 4: Review configuration and defaults
Rails introduces new defaults with each major release.
Use configuration comparison tools to review:
- Security settings and encryption configurations
- Caching behavior and performance tuning
- Asset handling and compilation options
- Logging configuration and error reporting
- Parameter filtering for sensitive data
Applying modern defaults often improves performance and security. However, changes must be validated thoroughly in staging before production deployment.
Step 5: Replace or refactor deprecated gems
Framework evolution often renders certain gems obsolete or unsupported.
This is an opportunity to:
- Replace unsupported libraries with maintained alternatives
- Consolidate overlapping dependencies to simplify the stack
- Remove unused gems that add unnecessary complexity
- Simplify architecture wherever possible
Cleaning dependencies reduces future upgrade friction and improves long-term maintainability.
Step 6: Perform multi-layer testing
Testing determines whether your upgrade is stable and production ready.
At minimum, include:
Unit testing
Validate individual methods, models, controllers, and service objects for correctness in isolation. This ensures that core business logic behaves as expected without being influenced by external dependencies or system integrations.
Integration testing
Confirm that different components of the application work together seamlessly. This includes verifying interactions between services, background jobs, mailers, databases, and external APIs to ensure data flows correctly across the system.
Regression testing
Ensure that existing functionality remains intact after upgrading code, dependencies, or configurations. Regression testing helps detect unintended side effects that may arise from framework changes or refactoring efforts.
Performance testing
Measure response times, database query efficiency, memory usage, and caching behavior under normal operating conditions. This helps identify performance degradation introduced during the upgrade process.
Load testing
Simulate peak traffic and concurrent user activity to uncover scalability limits and bottlenecks. Load testing validates that the upgraded application can handle real-world demand without instability or slowdowns.
Security testing
Identify vulnerabilities introduced during configuration updates, dependency changes, or framework modifications. This includes checking authentication flows, encryption mechanisms, access controls, and exposure to common security threats.
Upgrading Rails is also an opportunity to reassess your application against widely recognized security standards. Reviewing risks outlined in the OWASP Top Ten helps ensure your upgraded application is protected against common vulnerabilities such as injection flaws, broken authentication, and security misconfigurations.
Strong automated test coverage dramatically reduces upgrade anxiety and deployment risk.
How do you minimize downtime during deployment?
A Rails upgrade should not disrupt users or business operations.
Best practices include:
- Deploying first to staging for full validation
- Running smoke tests immediately after deployment
- Monitoring logs in real time for early detection of issues
- Using blue-green or rolling deployment strategies
- Keeping rollback procedures ready and documented
The first 48 hours post-launch are critical. Continuous monitoring ensures early issue detection and rapid response.
How to approach a Rails upgrade with long-term confidence
Upgrading a Ruby on Rails application is not about chasing the latest version. It is about protecting stability, strengthening security, and future-proofing your product.
The right approach begins with a clear evaluation of your current system, followed by strategic planning that aligns with business priorities. Controlled execution, supported by thorough testing and careful validation, reduces risk during the transition. Post-deployment monitoring ensures performance and reliability remain intact.
When managed methodically, a Rails upgrade becomes a strategic improvement rather than a disruption.
If your application has not been updated in years, start with a structured technical assessment or Rails upgrade consultation. If you would like guidance tailored to your codebase and business goals, contact us to discuss your upgrade strategy with our team. Early clarity makes the entire process predictable and aligned with your long-term growth goals.
